Getting Started
This guide provides step-by-step instructions for getting into the iGrafx Kafka Modules. You will learn how to clone the repository, launch Docker Compose, interact with the ksqlDB CLI and Kafka UI, and configure iGrafx Connectors and User Defined Functions (UDFs). Each component can be run locally, giving you flexibility for testing and development.
By following these steps, you can set up and use iGrafx Kafka Modules, manage data streams and transformations, and enhance your workflows with connectors and UDFs.
Step 1: Clone the Repository
Clone the iGrafx Kafka Modules repository to your local machine:
git clone https://github.com/igrafx/miningkafka.git
To do that you will need to install git: - Git
Ensure you have Docker and Docker Compose installed on your system. Follow these links for installation instructions: - Docker - Docker Compose
Furthermore, install chocolatey to be able to run the make commands. Do this in an admin windows Cmd hell:
@"%SystemRoot%\System32\WindowsPowerShell\v1.0\powershell.exe" -NoProfile -InputFormat None -ExecutionPolicy Bypass -Command " [System.Net.ServicePointManager]::SecurityProtocol = 3072; iex ((New-Object System.Net.WebClient).DownloadString('https://chocolatey.org/install.ps1'))" && SET "PATH=%PATH%;%ALLUSERSPROFILE%\chocolatey\bin"
You can then test if it was correctly installed by running the following command:
choco
Then open Git Bash terminal as admin and run the following command:
choco install make
You can now use the make commands without running into issues.
Step 2: Launch the infrastructure
This module provides a Kafka infrastructure setup located in the docker-compose/ subdirectory.
It includes essential components for managing and interacting with Kafka.
Starting the infrastructure
- Navigate to the docker compose directory:
cd docker-compose/
````

2. Start the infrastructure with the following command:
``` bash
make start
Stopping Docker Compose
To stop Docker Compose run the following command:
make stop
Cleaning Up
If you want to remove all the streams, tables or connectors and delete the data you inserted during your tests,
you can delete the /data folder that is in the /docker-compose directory.
Step 3: Use the ksqlDB CLI and Kafka UI
You can use either the ksqlDB CLI or the Kafka UI to interact with your cluster. It all depends on what you desire: - ksqlDB CLI: Ideal for executing ksql queries, managing streams, tables, and connectors programmatically, and debugging directly from the terminal. - Kafka UI: Provides a graphical interface for visualizing your Kafka cluster, inspecting topics, monitoring pipelines, and managing configurations with ease.
Choose the tool that best fits your workflow or combine both for maximum flexibility!
Access the ksqlDB CLI
- With the infrastructure running, type the following command from
/docker-composein a terminal to connect to the CLI:
docker-compose exec ksqldb-cli ksql http://ksqldb-server:8088
- Using the CLI, you can send ksql commands, and you can quit it by typing
exit.
If you are unfamiliar with ksqlDB, you may follow these links:
Access the Kafka UI
Kafka UI is a user interface you can use to get information about your kafka cluster, the topics, the ksql pipelines you created and more.
-
Open your browser and navigate to http://localhost:9021/ to access the Kafka UI.
-
Use the credentials from the
docker-compose.yml, located in the/docker-composedirectory under theJAVA_OPTSvariable:
 -
- Dspring.security.user.name represents the username.
- Dspring.security.user.password represents the password.
If you wish to change the credentials, you can do so by editing the docker-compose.yml file in the /docker-compose directory.
to do so, replace the admin value of the Dspring.security.user.name and Dspring.security.user.password variables with your desired credentials.
If you are unfamiliar with Kafka UI, you may follow these links:
Step 4: Retrieve JAR Files from the Latest Release
To utilize the iGrafx Connectors and UDFs, you need the corresponding JAR files. There are two ways to obtain these files:
- Build the JAR Files Yourself: Follow the instructions provided in the subsequent sections to build the JAR files manually.
- Retrieve JAR Files from the latest Release: You can directly download the JAR files from the latest release in the iGrafx Kafka Modules GitHub Project.
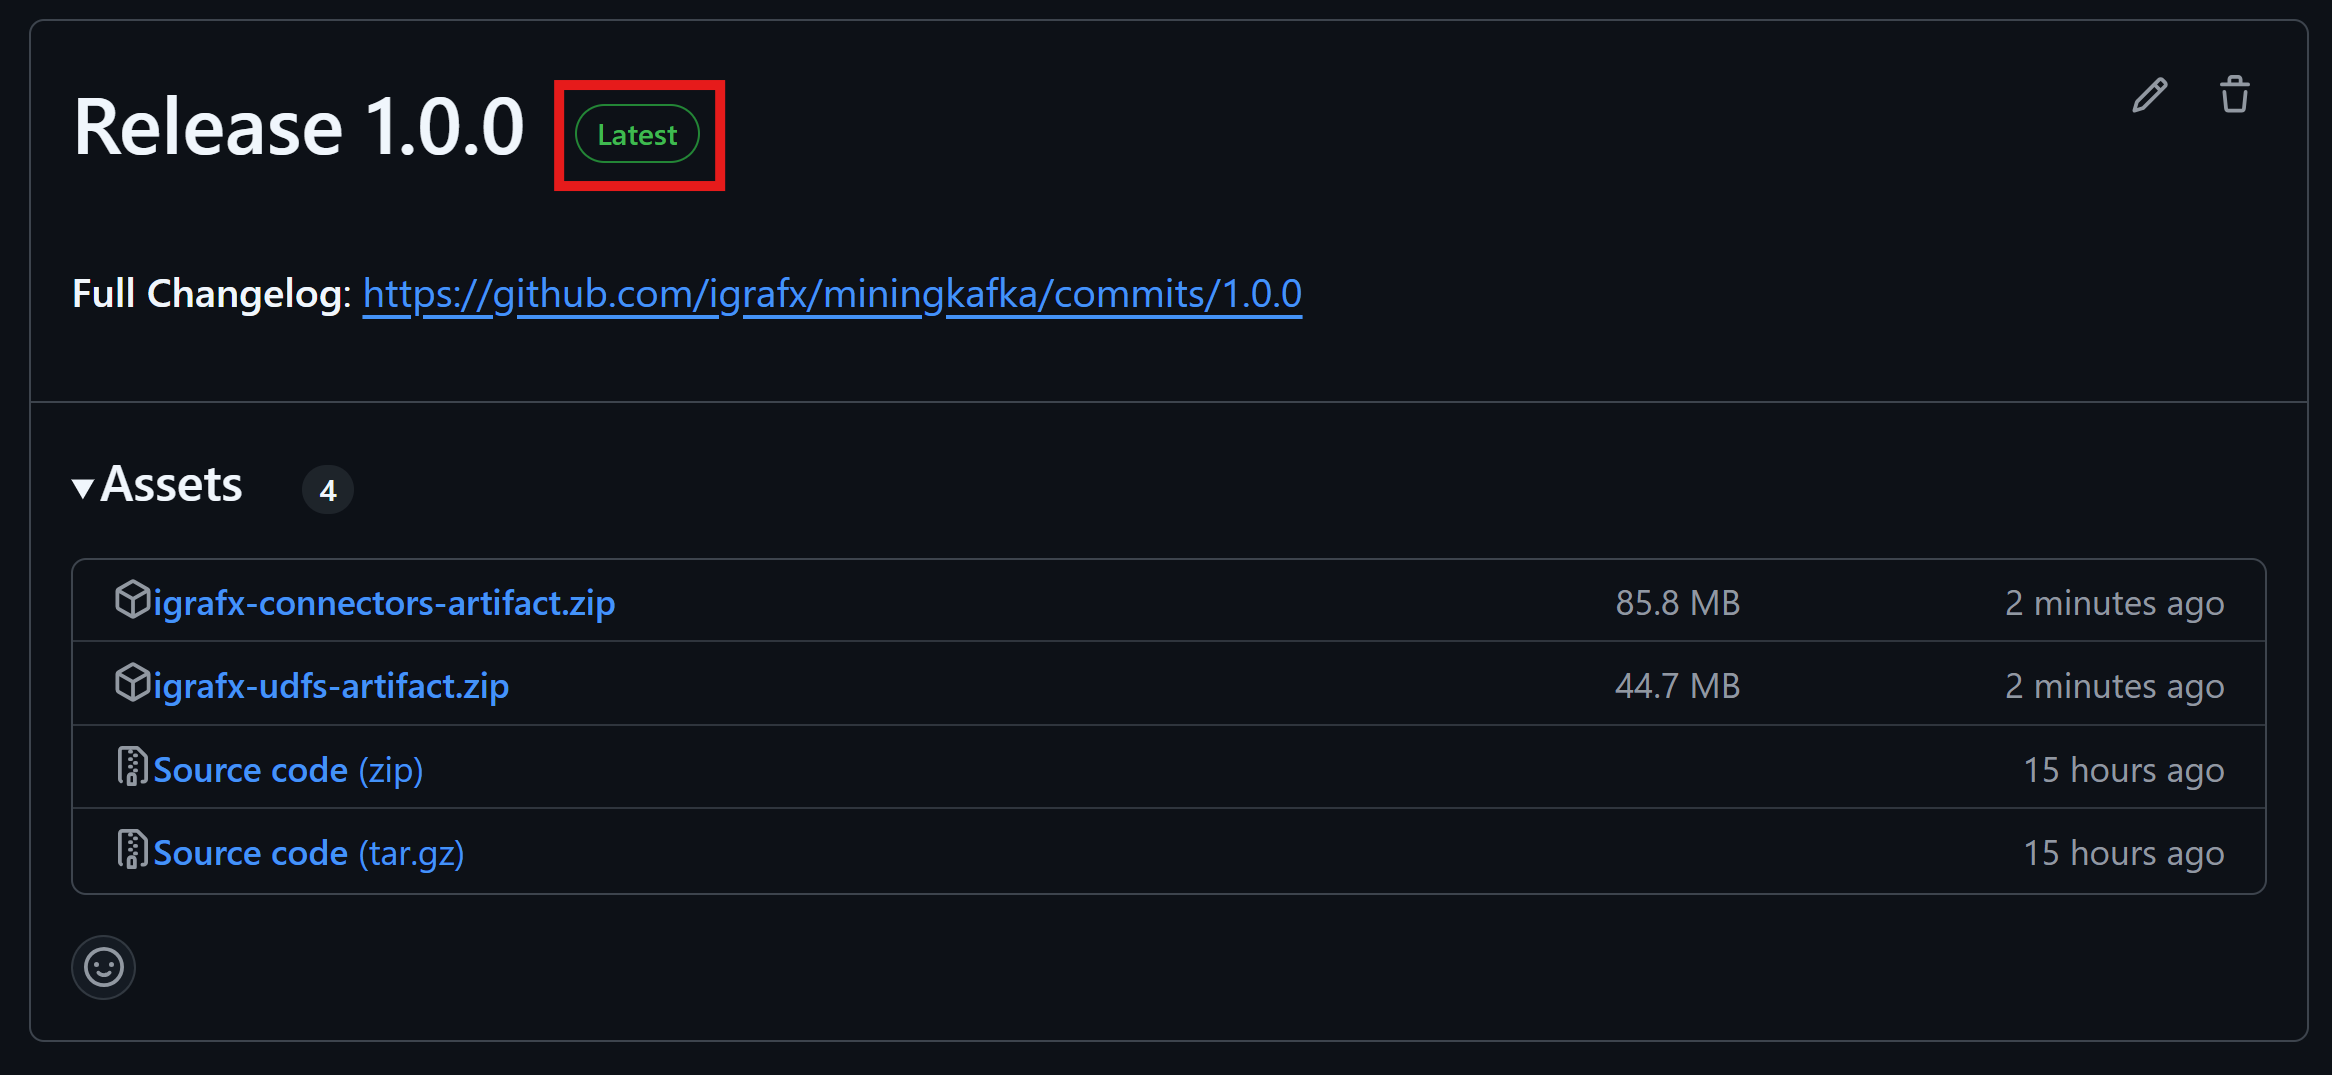
To retrieve the JAR files of the iGrafx Connectors and UDFs from the latest release, follow these steps:
- Navigate to the Release Section in the homepage of the GitHub repository.
- Make sure you are on the latest release. The latest release is indicated by the green label marked
Latestnext to the release number, as shown in the screenshot below:
- In the
assetssection, you will find 2 zip files, one for the Connectors and one for the UDFs.
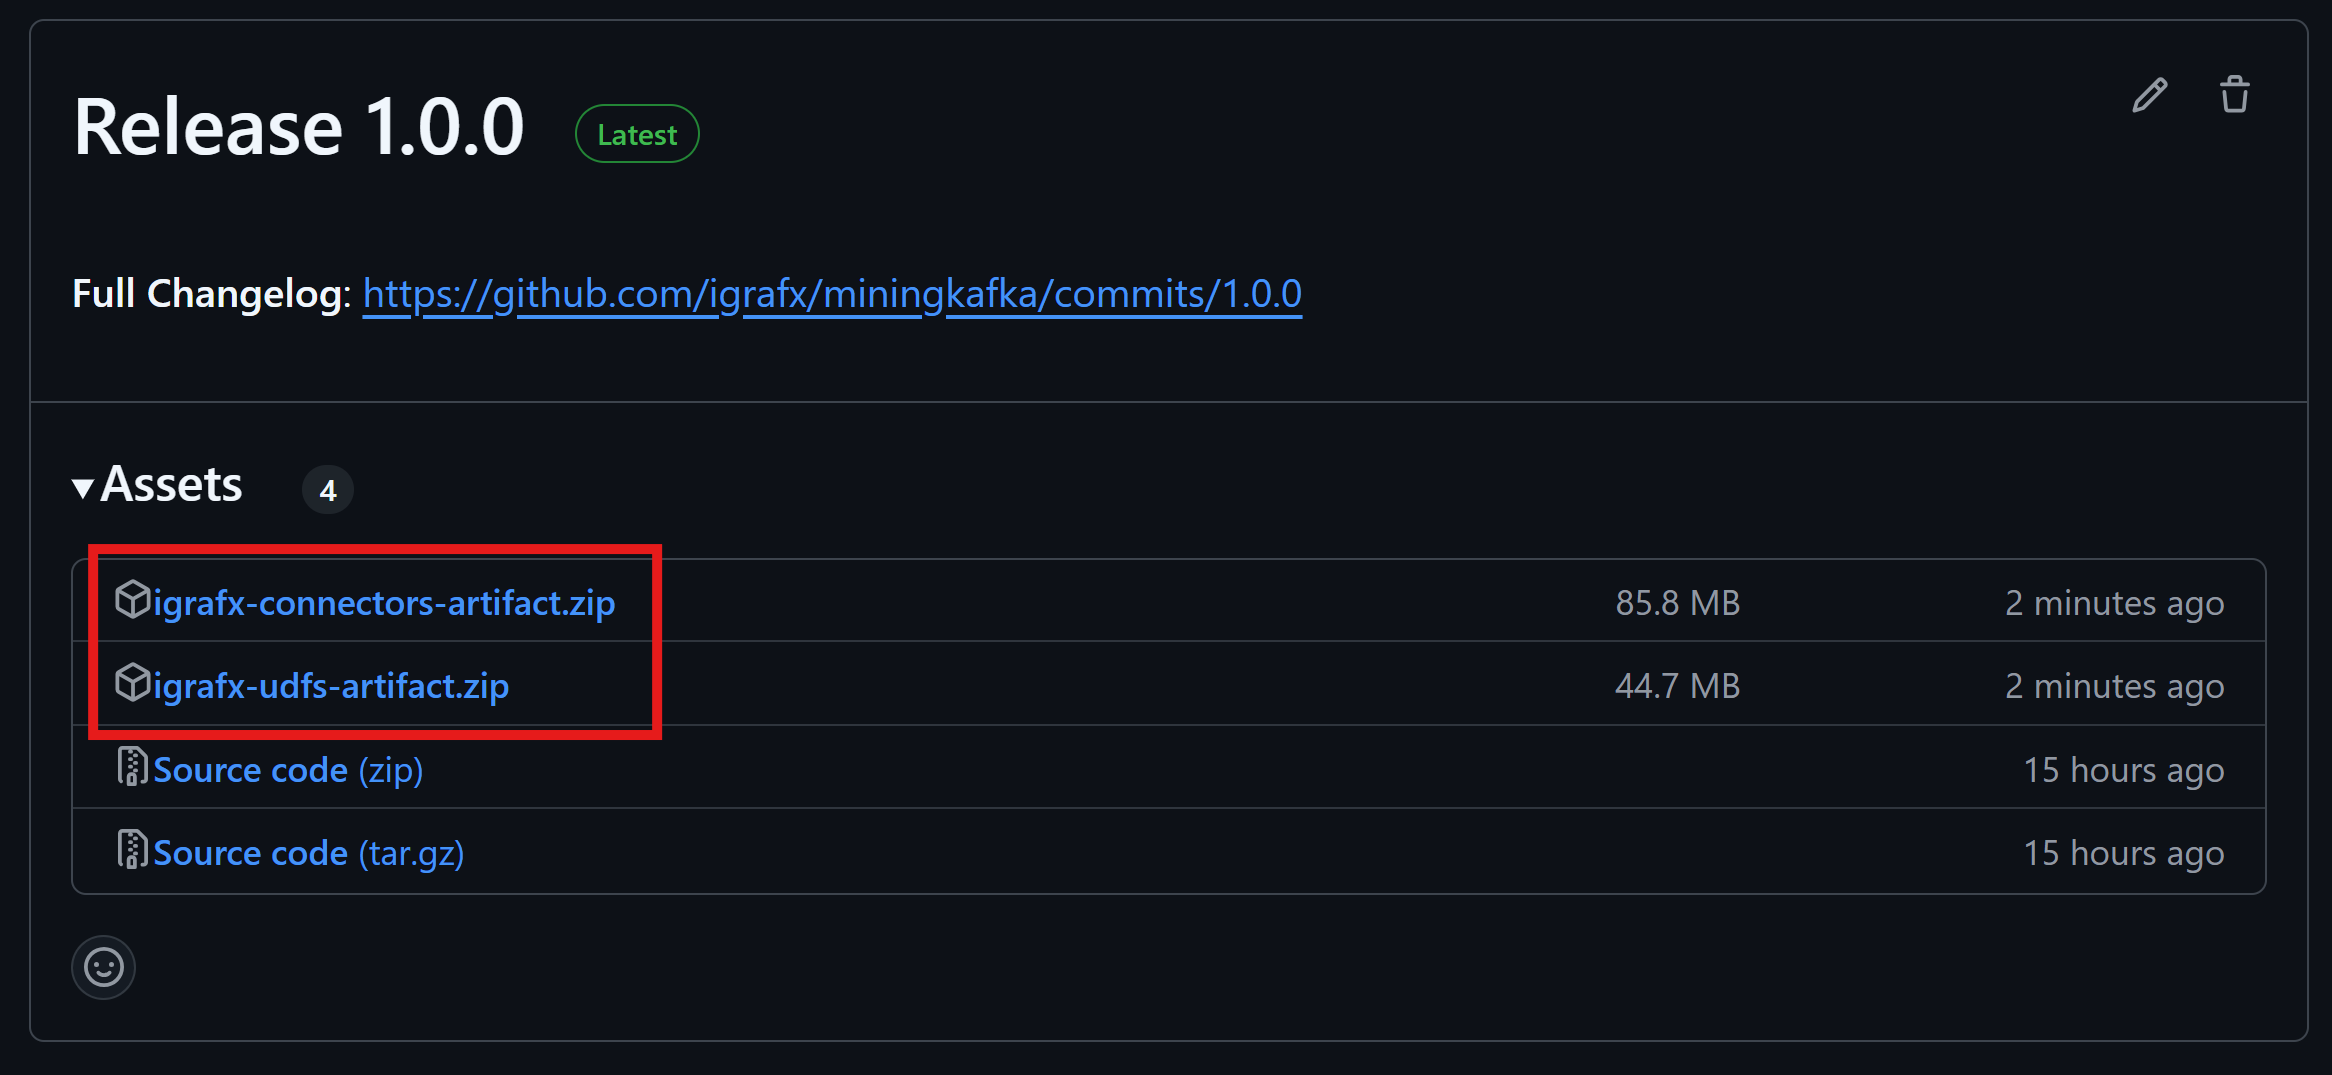
-
Click on igrafx-connectors-artifacts.zip or igrafx-udfs-artifacts.zip (or both if needed). This will download a ZIP file containing the JAR files.
-
Here is what you will find in the
igrafx-connectors-artifacts.zip: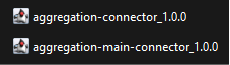
-
Here is what you will find in the
igrafx-udfs-artifacts.zip:
-
Once downloaded, extract the desired JAR files:
-
Place the Connectors JAR files in the
docker-compose/connect-plugins/directory of the Docker Compose module. This allows them to be used in the ksqlDB CLI. -
For UDFs JAR files, place them in the
docker-compose/extensions/directory of the Docker Compose module. If this directory does not exist, create it.
By following these steps, you can easily retrieve and configure the required JAR files for iGrafx Connectors and UDFs.
Step 5: Set Up iGrafx Connectors
The iGrafx Kafka Connectors module provides connectors specifically designed to streamline data flow in and out of Kafka. These connectors enable seamless integration with various data sources and destinations, allowing users to effortlessly move data into Kafka for analysis or export it for further processing.
There are 2 existing connectors in the iGrafx Kafka Connectors module:
- iGrafx Aggregation : aggregates Kafka records from a same partition.
- iGrafx Aggregation Main : aggregates Kafka records from a same partition and send the aggregation result to the iGrafx Mining API.
Build and configure iGrafx Connectors
If you have already retrieved JARS from the CI/CD pipelines, you can skip this section.
- To use the iGrafx Connectors to send data from Kafka to the Process360 Live,
you must go to the
igrafx-connectorsdirectory as follows:
cd igrafx-connectors/
- Now, build the desired JAR file using the following command:
sbt aggregationMain/assembly
````
Once the **JAR** is created, you can find it in the ``/igrafx-connectors/artifacts`` repository.
Copy the latest **JAR** and paste it in the ``/docker-compose/connect-plugins/`` directory of the Docker Compose module.

Now, by relaunching the docker compose with the ``make start`` command, you will now be able to use the connector in ksql.

# Monitor Connectors

1. To check the status of the connectors you created, use the following command in the **ksqlDB CLI**:

````sql
SHOW CONNECTORS;
````
Finally, if one connector has a ``FAILED`` state, you can check the logs in ``Kafka-connect`` by using the following command from the ``/docker-compose`` directory in the Docker Compose module :
````bash
docker-compose logs -f connect
````

# Step 6: Set Up iGrafx UDFs

UDFs (User Defined Functions) are useful for applying custom transformations to each value in a specific column of a stream.
The **iGrafx UDFs** module offers a set of User-Defined Functions (UDFs) specifically designed to enhance data transformation and analysis within the Kafka ecosystem.
You can create custom UDFs and integrate them into the environment, making them available for use in data pipelines to enhance processing and transformation capabilities.

There are 3 existing UDFs in the **iGrafx UDFs** module:
- The **[iGrafx Case Events UDF](https://github.com/igrafx/miningkafka/blob/master/howto.md#igrafx-case-events-udf)**  retrieves detailed information related to specific case IDs within Druid.
- The **[iGrafx Sessions UDF](https://github.com/igrafx/miningkafka/blob/master/howto.md#igrafx-sessions-udf)**  takes a collection of lines and organizes them into separate sessions.Each session groups related events.
- The **[iGrafx Transposition UDF](https://github.com/igrafx/miningkafka/blob/master/howto.md#igrafx-transposition-udf)**  transforms a single row containing multiple dates, each associated with specific activities, into multiple rows—each with a single date (or period) linked to its corresponding activity.


# Build and configure UDFs
>If you have already retrieved JARS from the CI/CD pipelines, you can skip this section.

1. To use the iGrafx UDFs, you must first go to the ``igrafx-udfs`` directory as follows:

```bash
cd igrafx-udfs/
- Build the desired JAR file containing all the UDFs using the following command:
sbt assembly
Once the JAR is created, you can find it in the /igrafx-udfs/target/scala-2.13 repository.
Copy the latest JAR and paste it in the /docker-compose/extensions/ directory of the Docker Compose module.
If this directory doesn't exist, you can create it.
Now, by relaunching the infrastructure with the make start command, you will now be able to use the UDFs in ksql.
Explore UDFs
- To display a list of available UDFs using the following command in the ksqlDB CLI:
SHOW FUNCTIONS;
- To check the documentation of a given UDF by using the following command:
DESCRIBE FUNCTION <UDF_NAME>;
Where